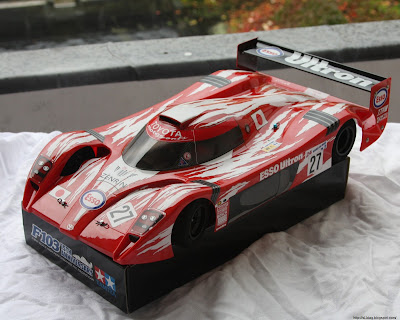
And here is the done deal:
That's it for now - no plans of driving it for now - on the shelf she goes ;)
edit: actually i missed two stickers on the front nose, they are on now
Tuesday, October 11, 2011
Tamiya Toyota GT-One part III
Next up is the chassis.
As I said this was a slightly used one, so i took it apart and cleaned it up thoroughly, thou it was barely used an hence barely dirty.
Starting to re-assemble. Kit came with a Tamiya Super Stock RZ 23T motor. Pretty nice. A good trick to remove small scratches in carbon fibre plates is to paint them with some clear paint. They will magically vanish.
And assembled, the foam tyres are a bit old and hard and show some cracks, have to get new ones later on.
Here is the chassi loaded with all electrics, that i stripped from another car i got from local ebay - trying to keep the costs down ;)
Tamiya Toyota GT-One part II
The windows are darkened with Tamiya Smoke paint, read some horror stories on the net how difficult it is to spray, so i decanted a bit in my airbrush and sprayed with that. Much easier to get an even finish :)
Here the result! Also as you can see I started decaling. Now the GT One is LOADED with decals - a little nightmare, especially over all the round parts. I litte trick I found on the net which was immensely helpful was to dip the stickers in slightly soapy water before applying, so you can move them around on the kit a bit. The press out the water and let them dry over night.
Next up a diffuser, an aftermarket part from ABC hobby, Type A diffuser. This one looks fairly close to what the original GT One had
Assembled diffuser.
Tamiya Toyota GT-One TS020 '98 - F103 15th Anniversary
Not a Gundam or a model kit in the classical sense, but i built up a RC car. Browsing through the net I stumbled upon the super awesome looking Toyota GT One Le Mans car from 1998/1999.
Tamiya made an 1/10 RC kit and i had to have it :)
Now the kit is of course long out of production but i managed to order a body from ebay, it's lexan/polycarbonate - a flexible plastic (good for crashing) that you paint from the inside.

The chassi the body/kit uses is a Tamiya F103, originally a RWD pancar type Formula 1 chassi but it works well for cars as well. Not any F103 but I got the 15th Anniversary edition from yahoo auctions Japan in a fairly mint condition.
The 15th Anniversary edition is pimped out to the max with carbon and aluminum parts :)
First step is cutting out the body, I use a hobby knife and just make thin cuts over the plastic, then i can break/rip the unneeded parts off - this looks much cleaner than cutting it out with scissors.
Drilling holes for the rear wing.
Aaand the cut out body.
You need special Lexan color to paint, which is flexible like the body. Regular color would just splitter off.
Got ahead of myself there and bought a can of the wrong red..., you usually only need one can for a car. The black is for the rearwing.
Pre-marked masking for the windows came with the kit. It's always a good idea to shake the cans long and well. Also if its a bit colder, put them in a warm water bath before spraying, this will result in a finer spray mist!
Voila!
A little bit paint leaked trough the masking tape, but you can easily polish it away with a bit compound.
Subscribe to:
Comments (Atom)


